

Payroll24 User Guide
Learn how to set up employees, calculate salaries, manage working time and absences, and resolve common payroll issues.
Overview and how payroll works
Payroll24 calculates salaries and payroll taxes by combining built-in standard Estonian payroll rules with your company and employee information.
What Payroll24 handles automatically
Payroll24 applies standard Estonian payroll rules, including payroll taxes, statutory rates and leave calculations. These rules are built into the software, so you don’t need to configure them yourself.
What you need to set up
You provide and maintain the information needed for accurate payroll calculations:
- Employees: Personal and employment details.
- Payroll Rules: Salary rates, pay types and employment conditions.
- Timesheets: Employee working hours.
- Absences: Vacations, sick leave and other absences.
- Employee-specific settings: Individual tax and payroll information.
- Opening Balances: Previous payroll information when starting with Payroll24, if applicable.
Your monthly payroll workflow
Each payroll period, follow this process to prepare and calculate employee salaries.
- 01Check employee details
- 02Update working time and absences
- 03Calculate payroll
- 04Review results
- 05Save payroll
Payroll24 calculates salaries and taxes based on your employee information, payroll rules and recorded working time.
What you set up and what Payroll24 manages
What you set up
You provide and maintain the company and employee information Payroll24 needs to calculate payroll accurately. Keep this information up to date, especially when employees, salaries or working arrangements change.
| You maintain | What it is used for |
|---|---|
| Employees | Employee details and employment information |
| Payroll Rules | Salary, pay type, workload and applicable period |
| Timesheets | Working time used in payroll calculations |
| Assign vacations | Vacations, sick leave and other absences |
| Opening Balances | Earlier payroll information when needed |
| Employee-specific settings | Individual payroll and tax circumstances |
Opening annual leave balances: If your employees have unused annual leave from before your company started using Payroll24, enter those balances under Accrued leave during initial setup. See Accrued leave and other absences.
What Payroll24 manages
Payroll24 provides built-in rules for standard Estonian payroll calculations, including:
- Payroll taxes and statutory rates
- Leave entitlement and absence calculations
- Termination reason options, with related requirements and payment information
- Standard average-pay calculations
These rules are applied automatically using the employee information and payroll records you maintain.
When terminating a contract, review the calculation and check that any required employment registration updates are completed. See Terminating an employee.
Settings for special cases
Most companies can use the standard settings without changes. For specific payroll situations, you can review the following:
- Absence rules
- Review how paid absences are calculated for a specific absence or pay type.
- Payroll Taxes
- Review the payroll taxes and the accounts they are posted to.
- Public holidays
- Review the holidays used when counting working days.
- Nominal working hours per month
- Review the standard monthly hours used by hourly pay.
Only adjust these settings when your payroll situation requires it.
Calculating salary
Once employee information, Payroll Rules, working time and absences are up to date, you can calculate payroll for the selected period.
Add Payrun
- Open Payroll Report and select Add Payrun.
- Choose the payroll period, payment date and employees to include.
- Click Search to prepare the payrun.
Payroll24 uses the available employee information, Payroll Rules, Timesheets and absences to prepare the initial calculation.
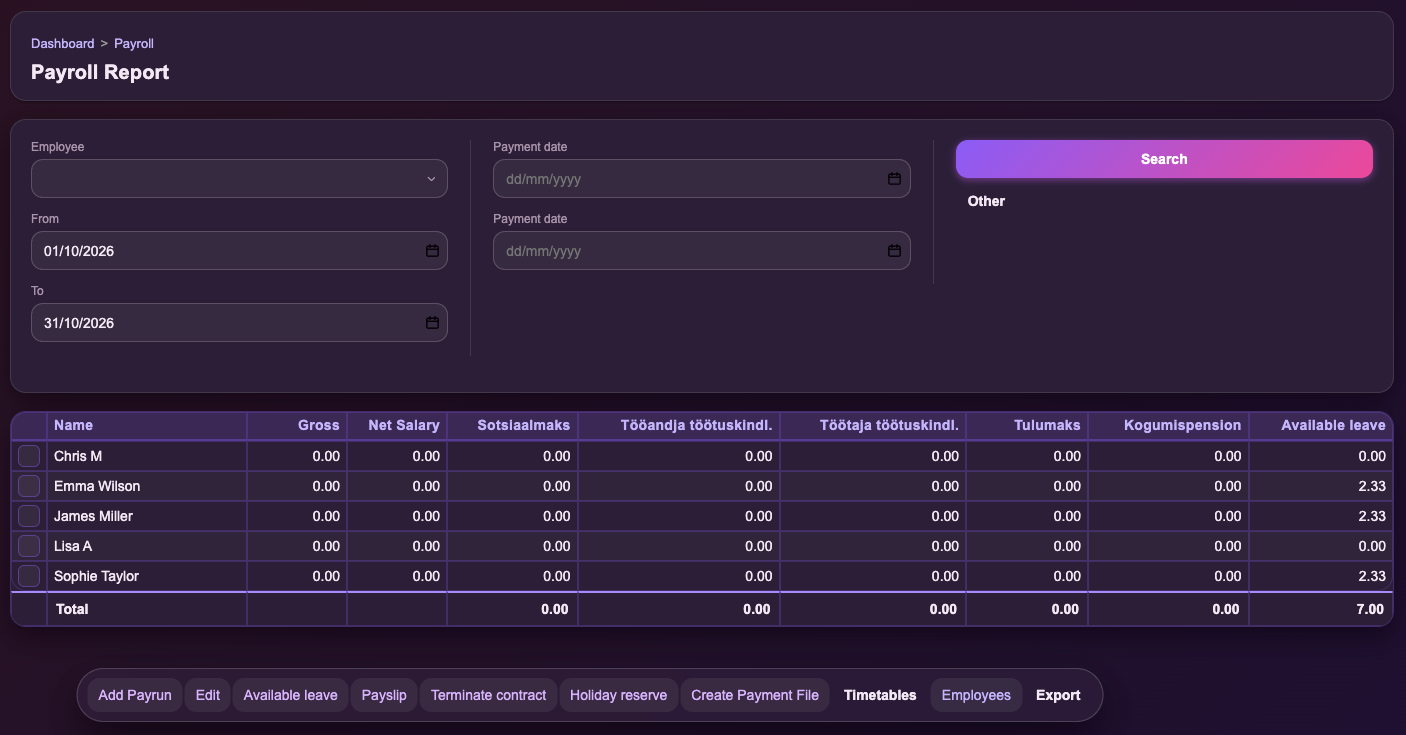
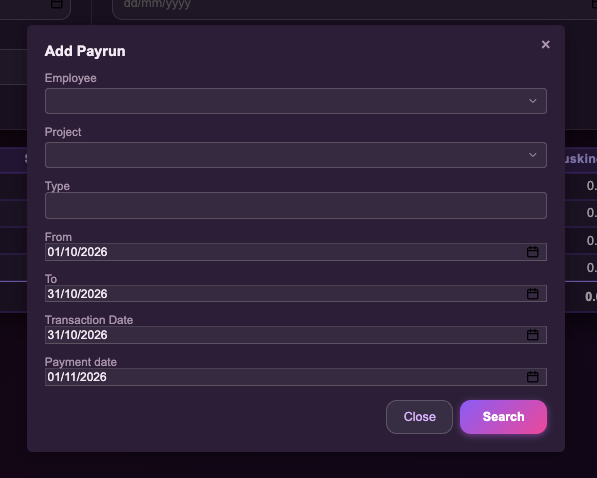
- 1
Payroll period: Check the start and end dates.
- 2
Payment date: Set the date when salary will be paid.
- 3
Search: Select Search to create the payrun for the selected employees.
Review Gross pay
- Review the employees, worked days, quantities and Gross amounts.
- Check the Transaction Date and Payment date.
- Verify that the earnings are correct before calculating taxes.
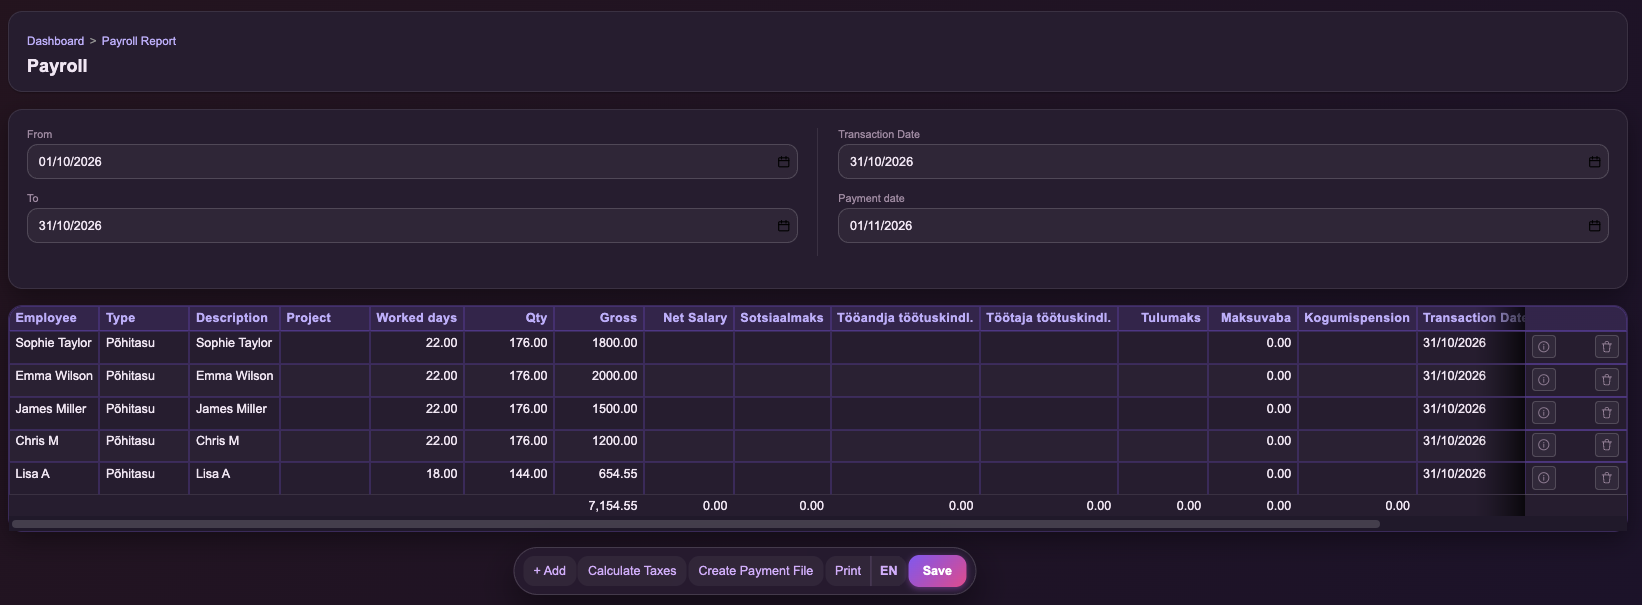
- 1
Gross pay: Review employee earnings.
- 2
Dates: Check Transaction Date and Payment date.
Calculate Taxes
- Click Calculate Taxes.
- Review the calculated Net Salary, payroll taxes and deductions.
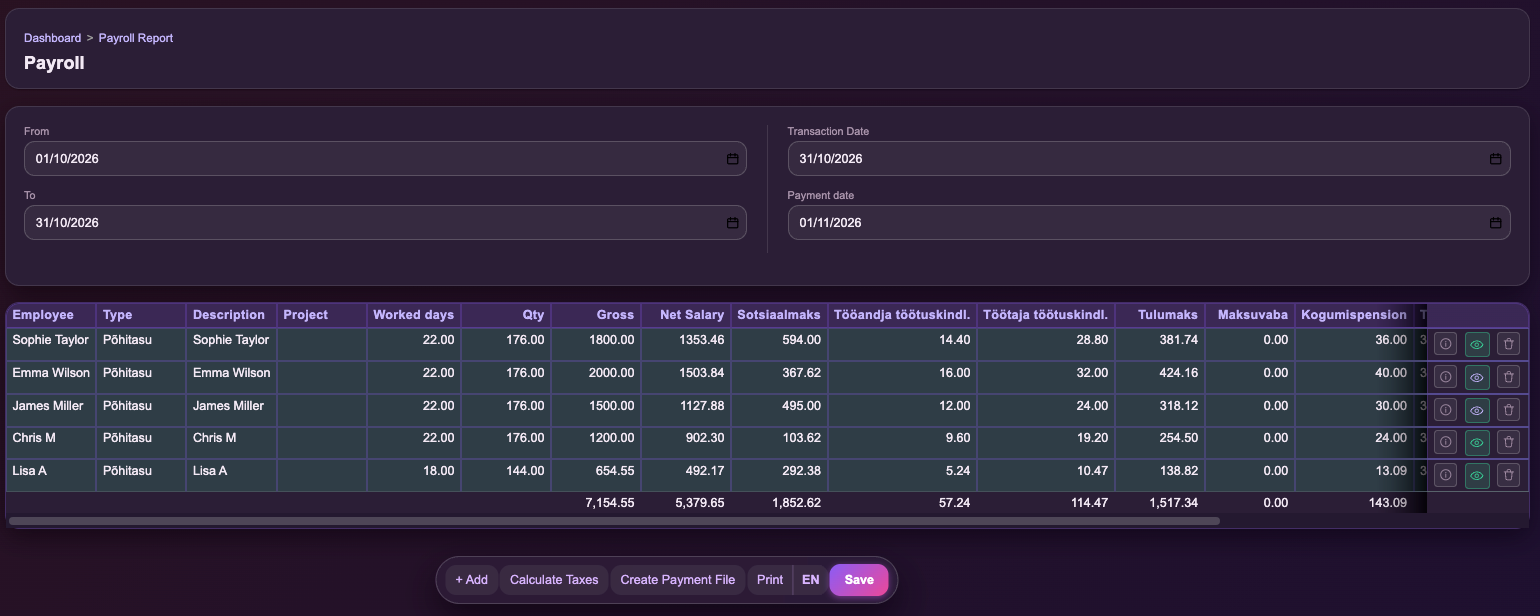
- 1
Calculated results: Review Net Salary, taxes and deductions.
Review and save payroll
Check the calculated results for each employee. If an amount or warning is unexpected, review the source information before saving.
When the calculation is correct, click Save.
You can find the saved payroll in Payroll Report. For payslips and exports, see Reports and payroll outputs.
Editing a saved payroll
To edit an existing payroll:
- Open Payroll Report.
- Click Edit.
- Choose the Payroll period you want to edit.
- Review and make the necessary changes.
- Recalculate taxes if the changes affect the calculation, then save the updated payroll.
See how a salary was calculated Optional
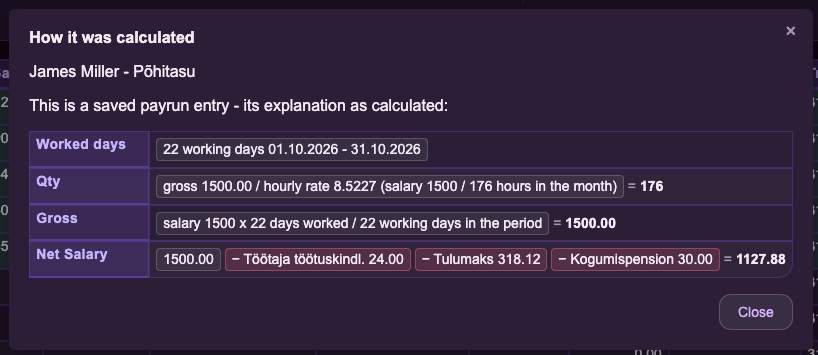
You can review the salary calculation details to understand how employee earnings and deductions were calculated.
- 1
Worked days: Working days used in the calculation.
- 2
Quantity: Quantity used to calculate earnings.
- 3
Gross salary: Gross earnings calculation.
- 4
Net salary: Taxes and deductions applied to gross earnings.
Create Payment File Optional
Once payroll has been reviewed and saved, you can prepare a payment file for your bank.
- Click Create Payment File.
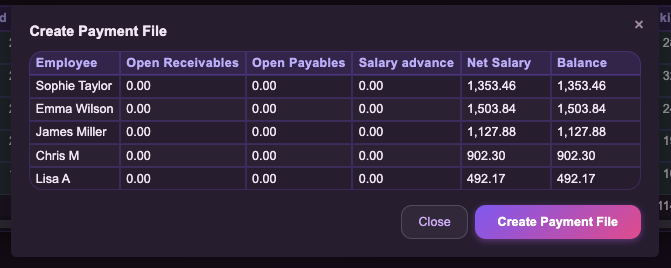
- Review each employee’s Net Salary and Balance.
- Click Create Payment File to continue.
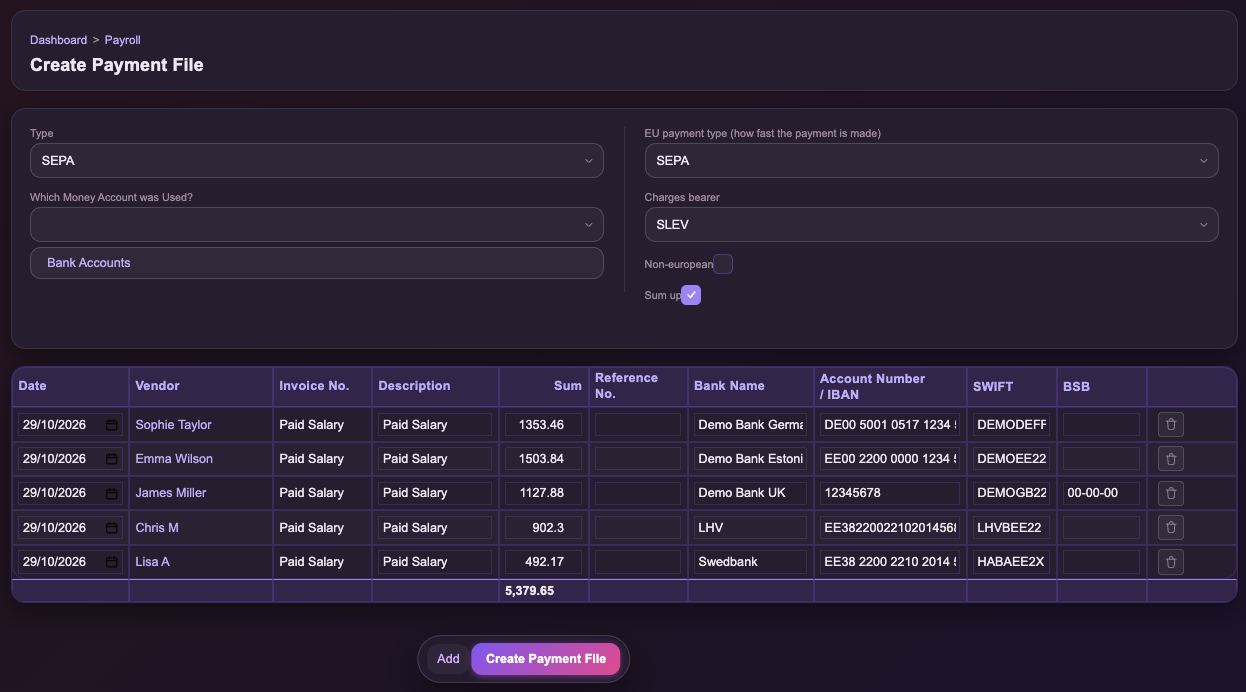
- Select the payment format, such as SEPA.
- Review payment amounts and bank account details.
- Click Create Payment File to generate the file.
- 1
Net Salary / Balance: Review the employee salary and payment balance.
- 2
Create Payment File: Continue to payment file preparation.
- 1
Payment format: Select the appropriate format, such as SEPA.
- 2
Payment details: Check payment amounts and bank details.
- 3
Create Payment File: Generate the payment file.
Creating a payment file does not automatically transfer salaries. The file must be processed through the relevant bank workflow.
Accounting entry Advanced
Payroll24 displays accounting entries connected with the saved payroll, where applicable.
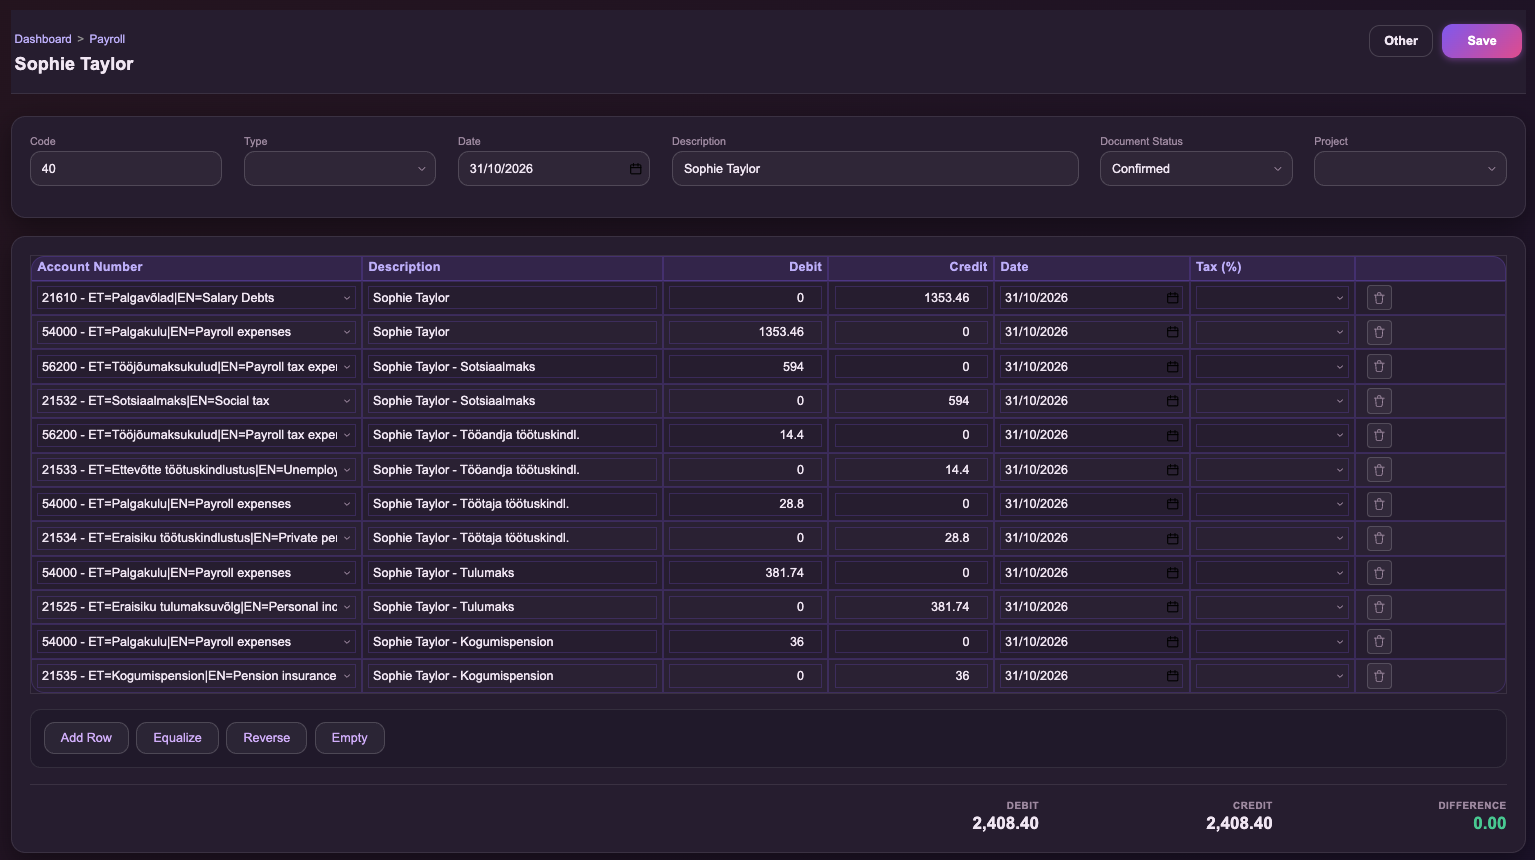
The accounting entry shows the accounts, debit and credit amounts, and descriptions associated with the payroll calculation.
- 1
Account: Shows which accounting account is used.
- 2
Debit and credit: Shows how the payroll amount is posted.
- 3
Description: Identifies the employee and payroll item.
- 4
Balanced entry: Debit and credit totals should balance.
Absences and timesheets
Before calculating payroll, review employee working time and absences to ensure the records are complete and accurate. Payroll24 uses this information alongside Payroll Rules to calculate salaries for the selected period.
Timesheets
Use Timesheets to record and manage employee working hours, particularly for employees paid based on hours worked.
- Open Timesheets.
- Select the relevant employee and period.
- Add or review the working-time entries.
- Before calculating payroll, review the relevant timesheet entries and resolve any incomplete or incorrect records that could affect the calculation.
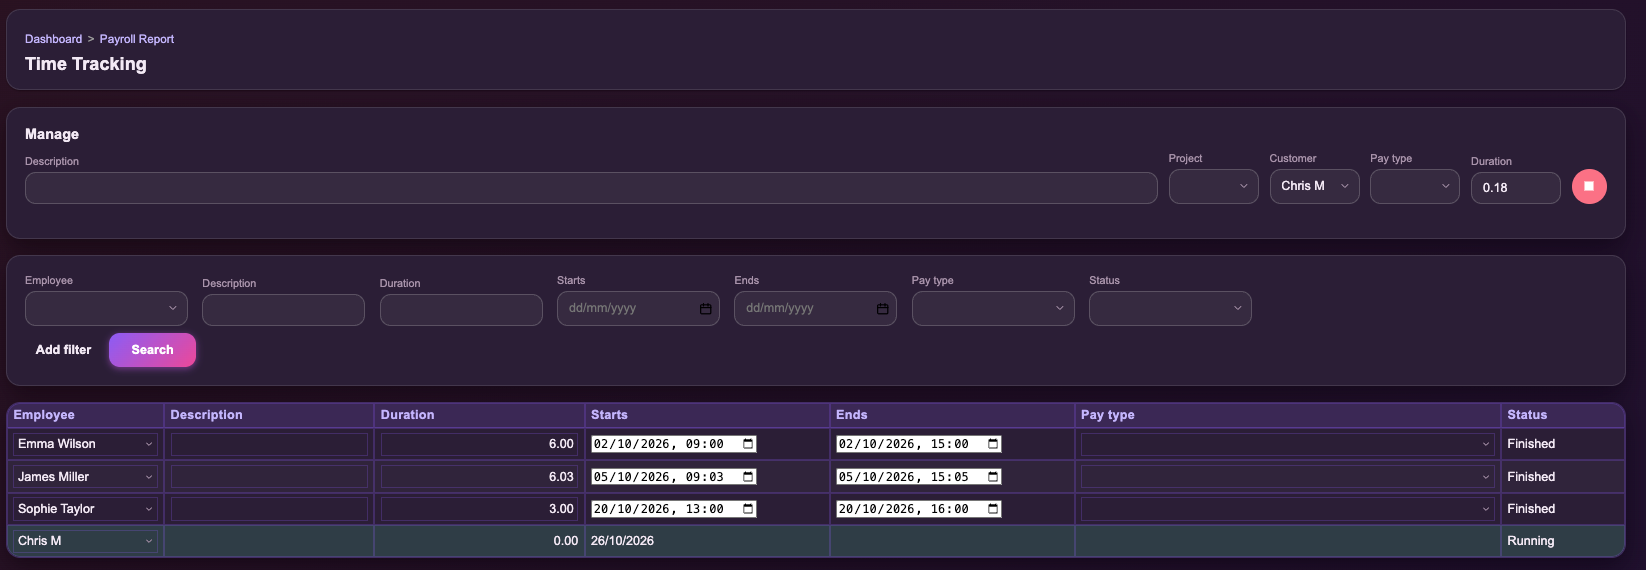
- 1
Duration: Total working time recorded for each entry.
- 2
Starts / Ends: Start and end times of the recorded work.
- 3
Status: Indicates whether a time entry is Finished or still Running.
Check that each entry is assigned to the correct employee and pay type, where applicable.
Assign vacations
Use Assign vacations to record employee vacations, sick leave and other absences. Payroll24 uses these records when calculating payroll.
- Open Assign vacations.
- Select the employee.
- Enter the absence start and end dates.
- Select the appropriate Absence type and Pay type, where applicable.
- Save the record.
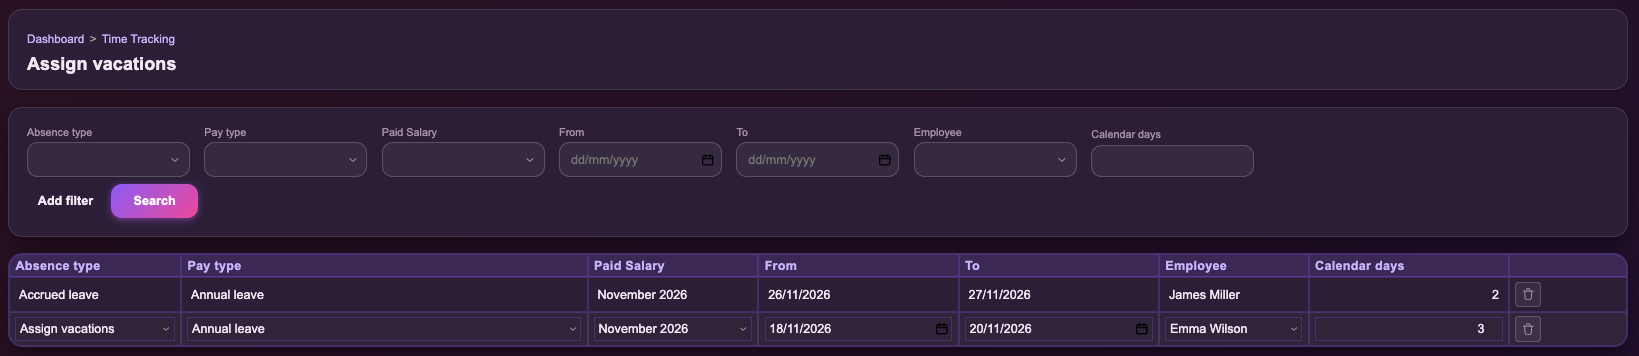
- 1
Pay type: Identifies the type of leave or absence payment, such as Annual leave.
- 2
From / To: The start and end dates of the absence.
- 3
Employee: The employee to whom the absence applies.
Accrued leave and other absences
- Accrued leave (opening balance)
- When your company starts using Payroll24, enter each employee’s existing unused annual leave balance under Accrued leave. This is the opening balance carried over from your previous payroll system or records. It ensures that annual leave earned before switching to Payroll24 is included in the employee’s leave balance. Use Assign vacations separately to record actual vacation periods.
- Other absences
- Use this for other absence types, such as sick leave, study leave or unpaid leave. Select the appropriate pay type where required so Payroll24 can apply the relevant calculation rules.
Important: Enter the opening balance based on the employee’s unused annual leave as of the company’s transition to Payroll24. Do not enter the employee’s total historical leave entitlement or duplicate vacation days already taken.
How absences affect payroll
Recorded absences can affect an employee’s working time, Gross pay, leave balance and applicable absence payments.
Before calculating payroll, verify that:
- Absence dates are correct.
- The appropriate Absence type and Pay type are selected.
- Each absence is assigned to the correct employee.
If Payroll24 displays a warning or error, see Warnings or Errors and troubleshooting.
Hiring and terminating an employee
Hiring an employee
To hire a new employee in Payroll24, first create their employee record and then set up their employment and payroll information.
- Open Employees.
- Click + Add to open the New Contact form.
- Enter the employee’s details.
- Set Type to Employee.
- Click Save to create the employee record.
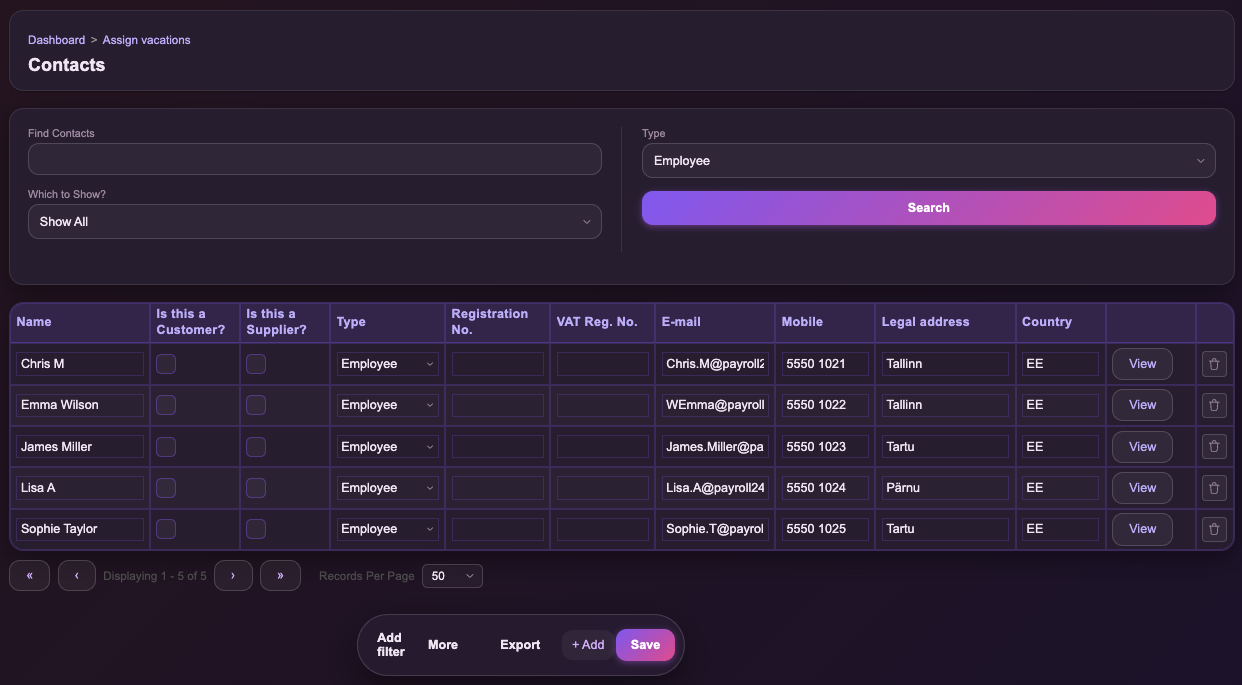
- 1
+ Add: Opens the New Contact form.
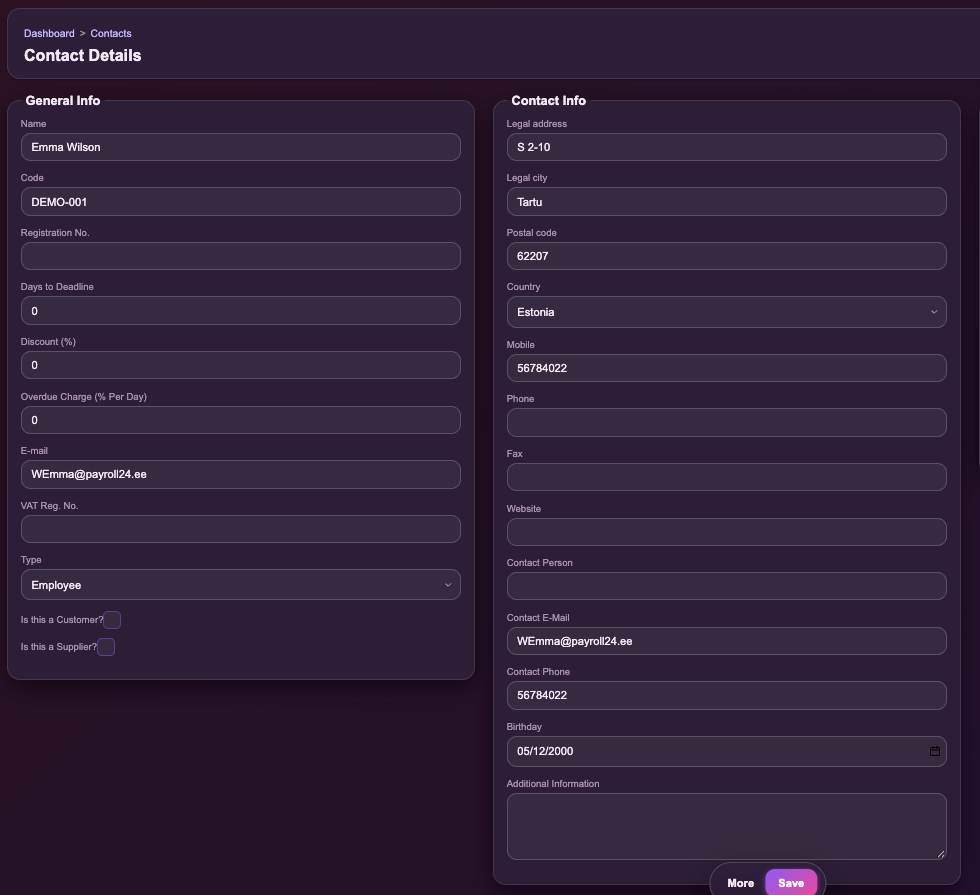
- 1
Type: Make sure the contact is classified as Employee.
- 2
More: Open additional employee attributes and settings.
For more information about individual employee attributes, see Employee-specific settings.
After creating the employee record, set up the employee’s Payroll Rules, including the applicable start date, before calculating their first salary.
Set up Payroll Rules
After creating an employee record, set up their Payroll Rules to define the salary or pay rate, pay type, workload and applicable dates.
- Open the employee’s Payroll Rules.
- Select the appropriate Pay type, such as Base salary.
- Enter the gross salary or pay rate.
- Set the workload and the From date when the rule takes effect.
- Save the rule.
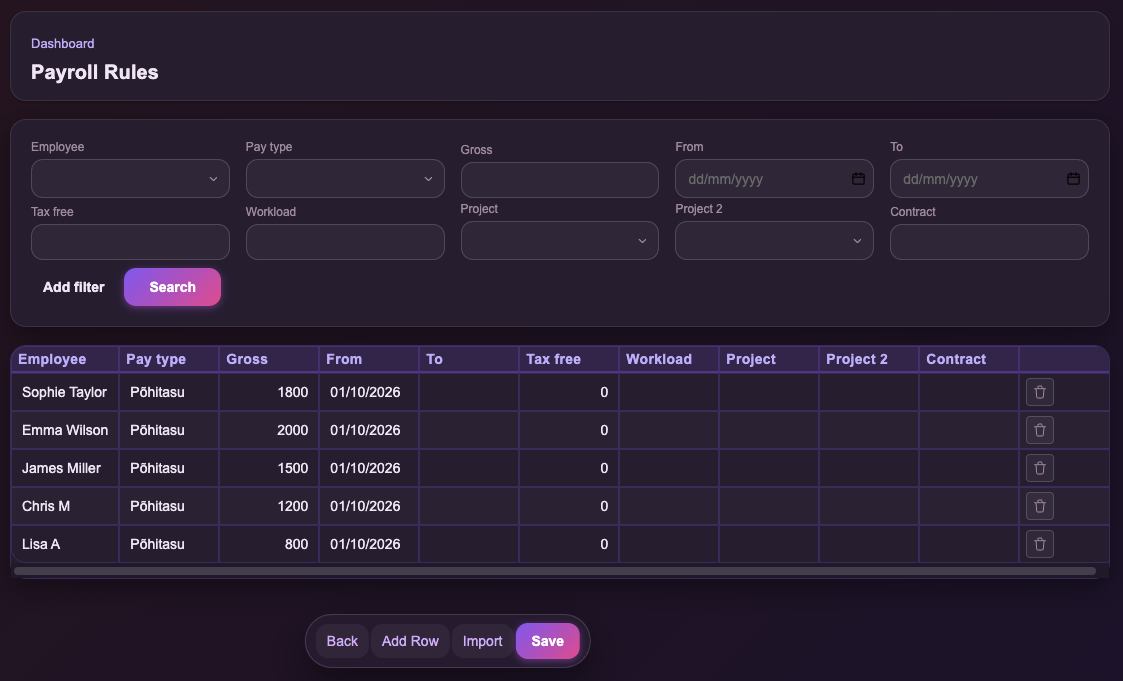
- 1
Pay type: Select the employee’s salary or payment type.
- 2
Gross: Enter the agreed gross salary or pay rate.
- 3
From: Set when the Payroll Rule starts to apply.
Make sure the employee has an applicable Payroll Rule before calculating their first salary. For details about reviewing or updating existing rules, see Employee-specific settings.
Employment Register / TÖR
The Employment Register (TÖR) is used to manage employment registration information, including employment dates, contract details and registration status.
Employment must generally be registered with the Estonian Tax and Customs Board before an employee starts working.
Registering new employment in TÖR
Payroll24 is connected to the Estonian Tax and Customs Board (e-MTA), allowing you to submit new employment registrations to the Employment Register (TÖR) directly from Payroll24.
- Open Employment Register in Payroll24.
- Enter or review the required employment registration details.
- Click Send to Tax Authority to submit the registration to e-MTA.
- Check the Status field for the submission result.
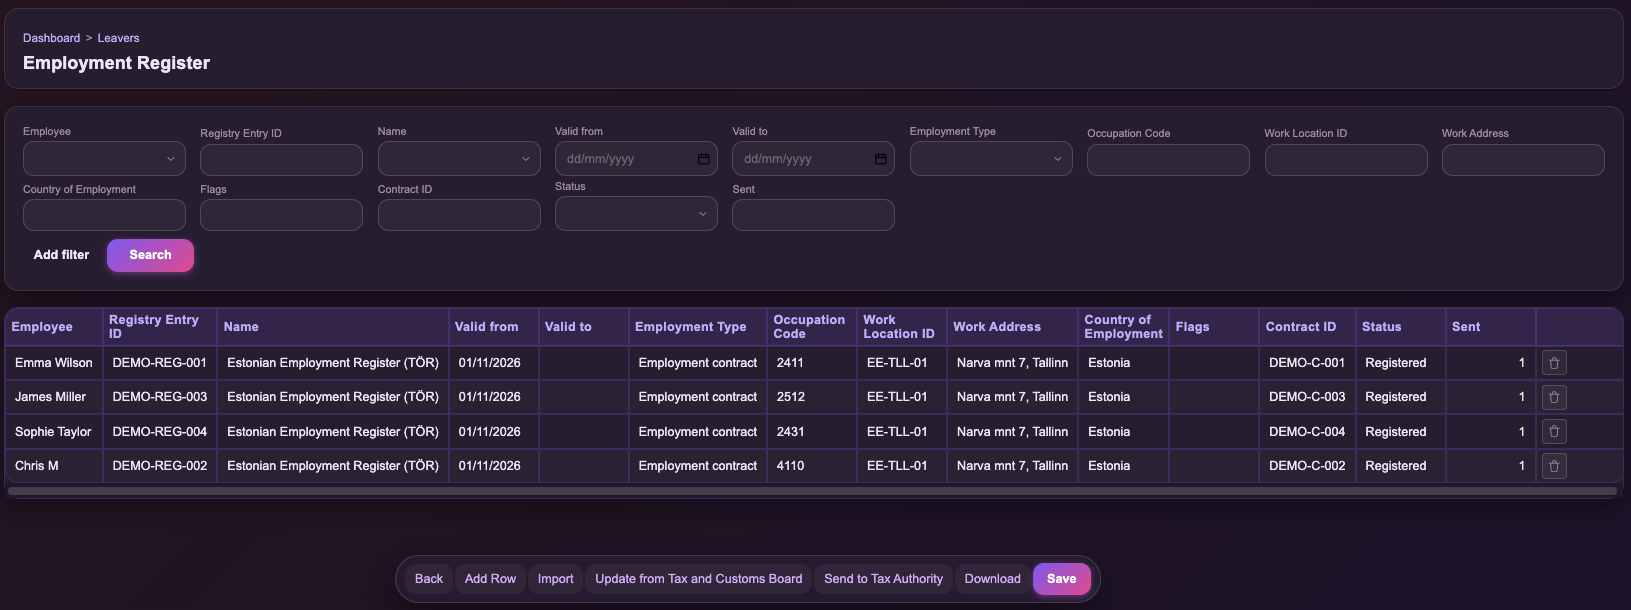
- 1
Employment details: Review the employee, employment dates, contract type and occupation information.
- 2
Status / Sent: Check the displayed registration status and sending indicator.
- 3
Registration actions: Use the available actions to add, update, import or send registration information.
Important: Submitting a registration does not necessarily mean it has been accepted. Check the returned status and resolve any errors.
Terminating an employee
To terminate an employee’s contract in Payroll24:
- Open Payroll Report and select the employee.
- Click Terminate contract.
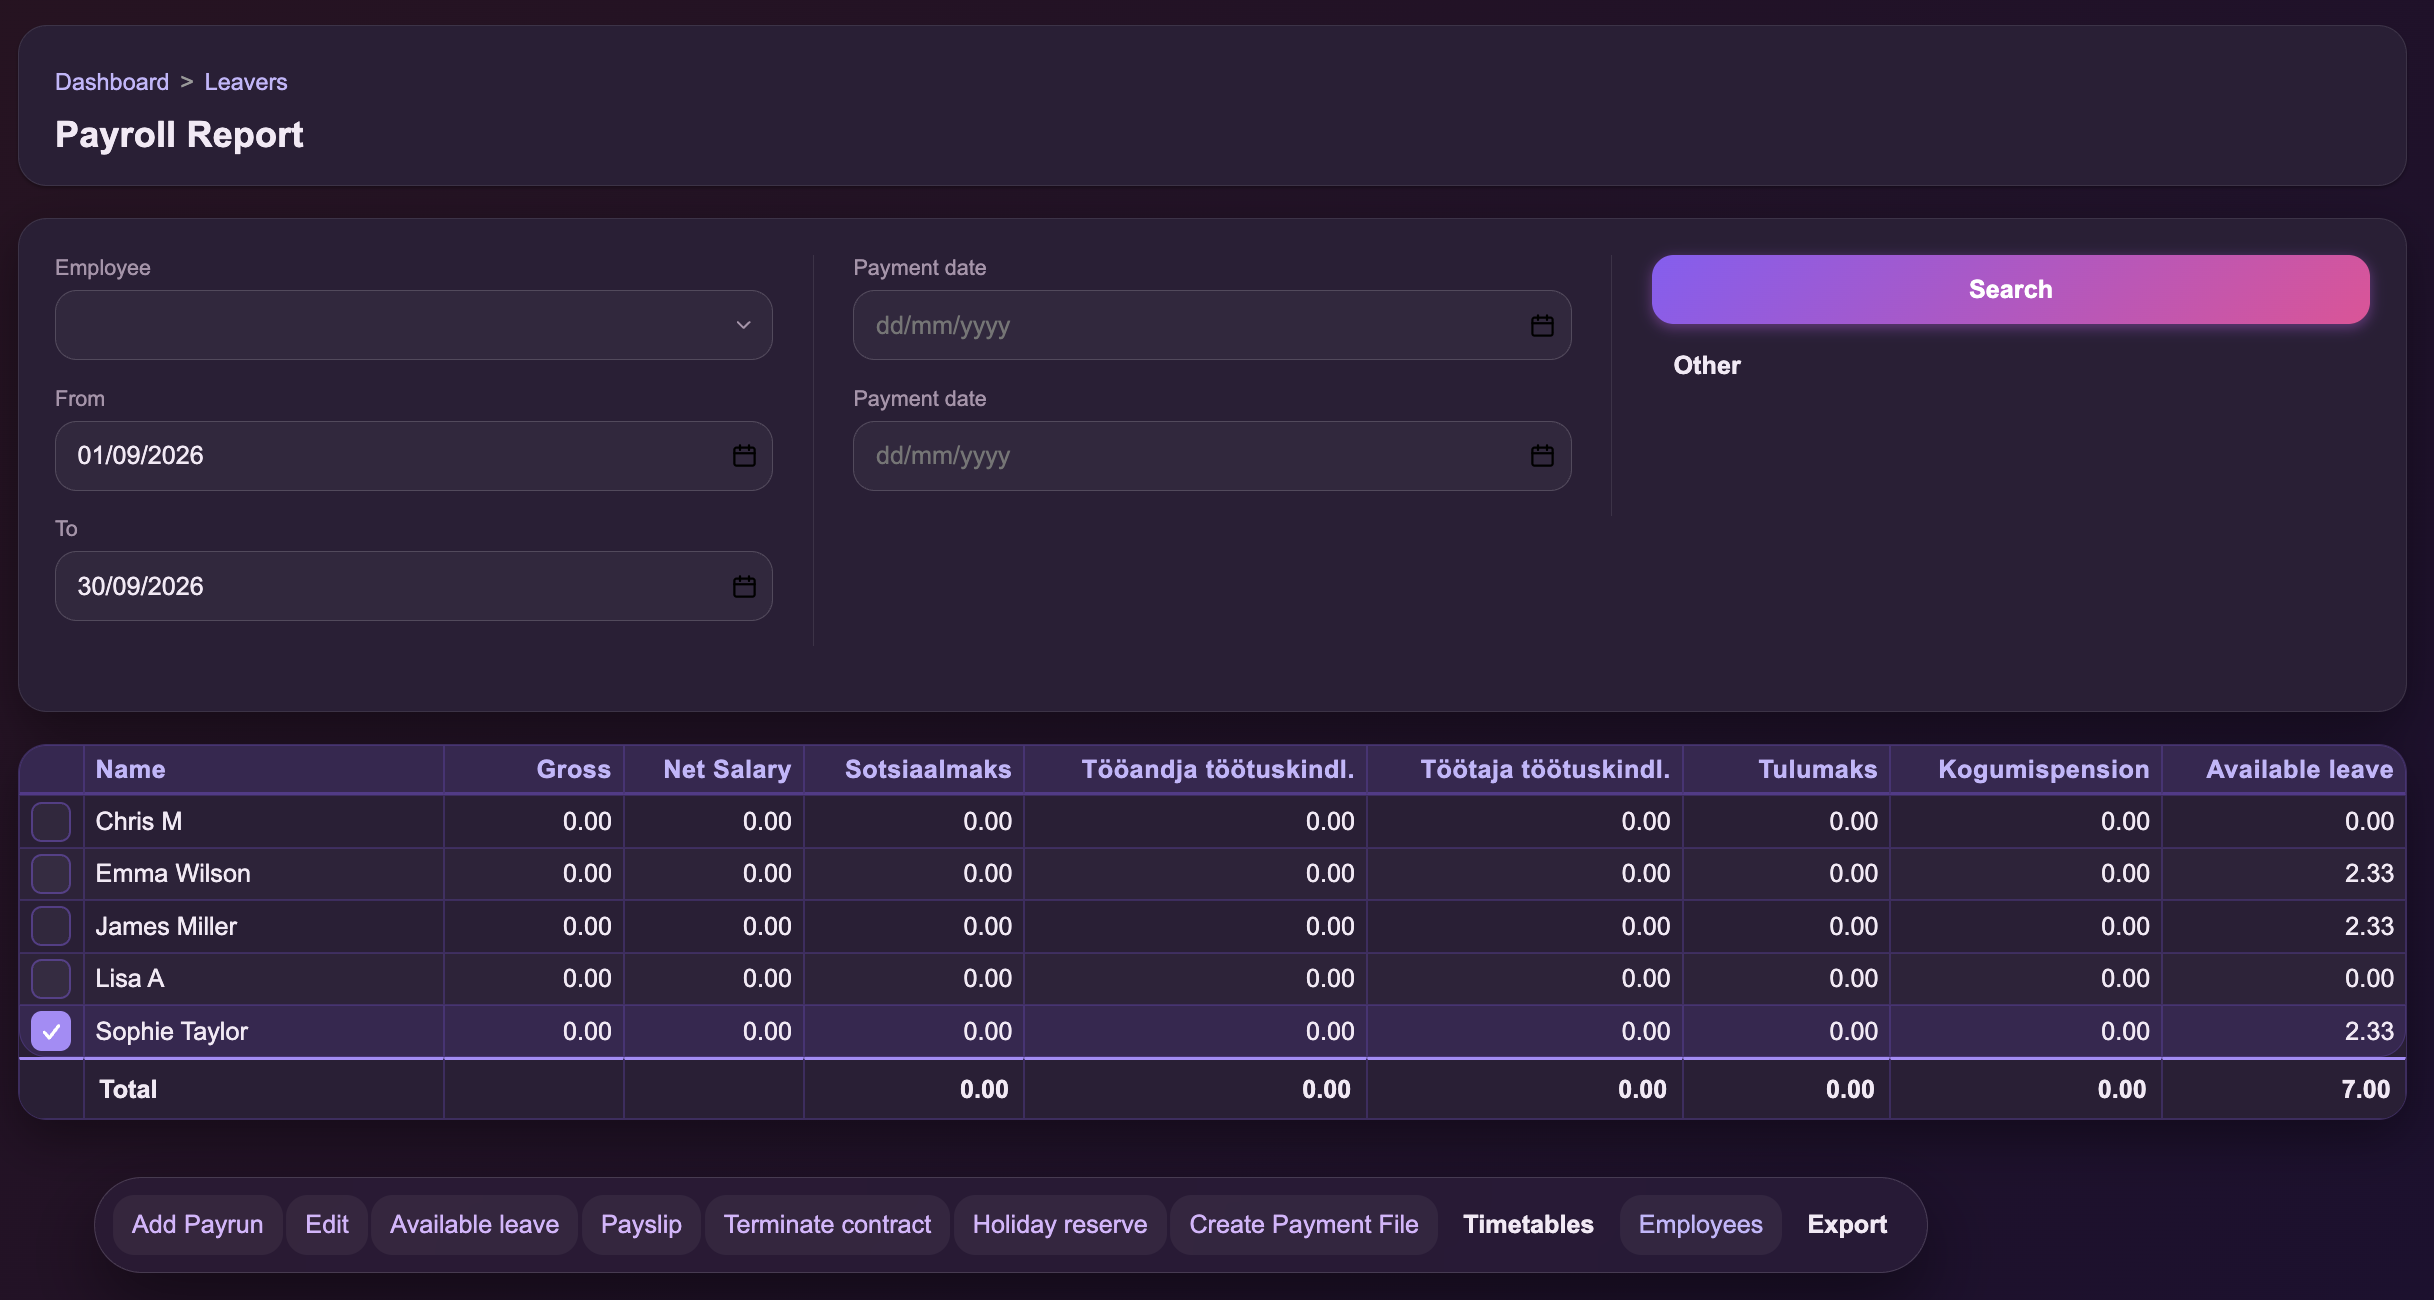
- 1
Select employee: Select the employee whose contract will end.
- 2
Terminate contract: Click Terminate contract to open the termination dialog.
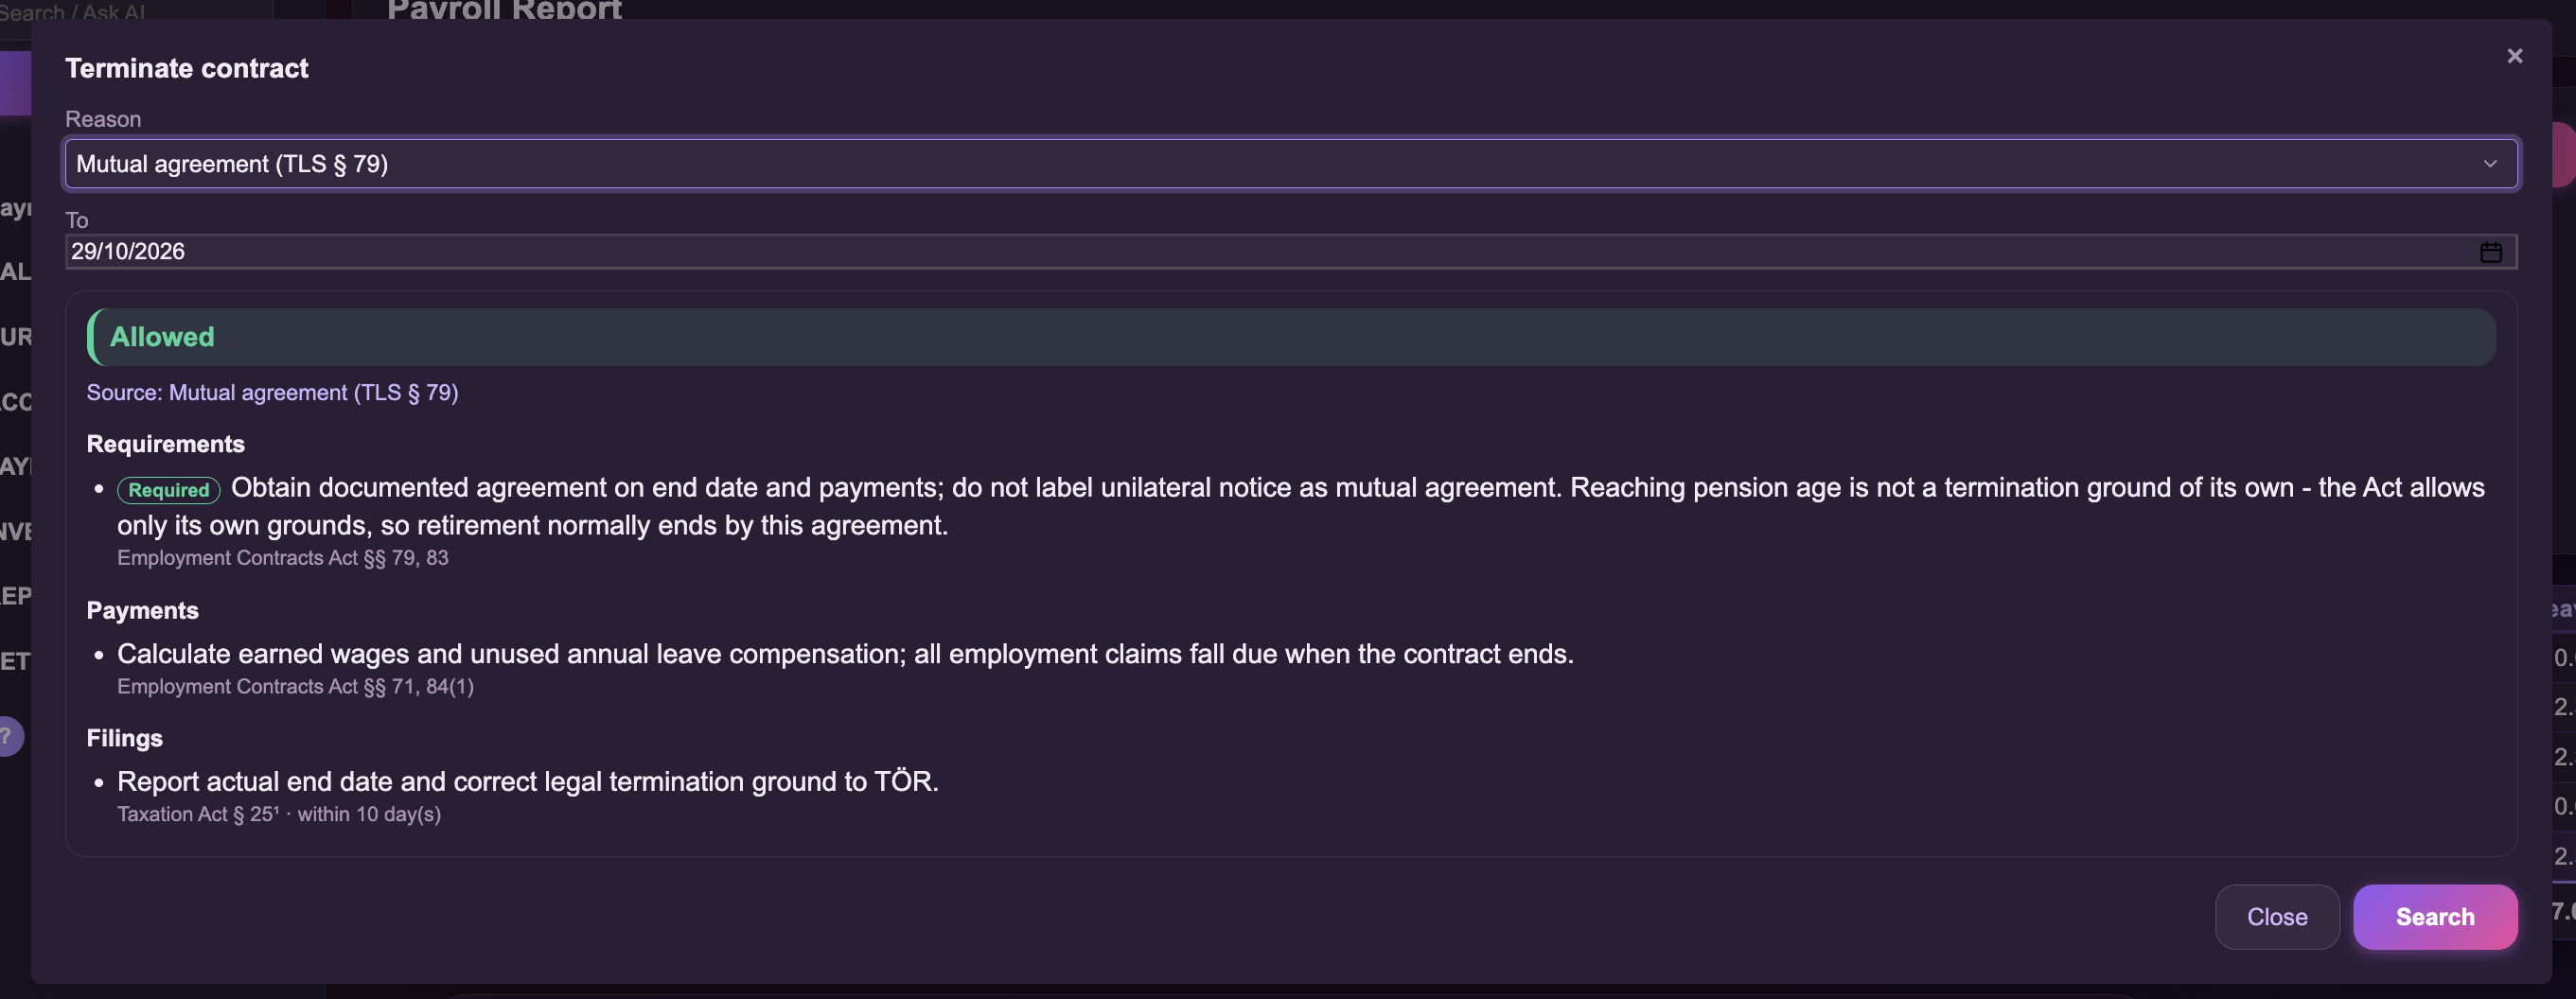
- Select the appropriate termination reason in the Reason field.
- Enter the employment end date in the To field.
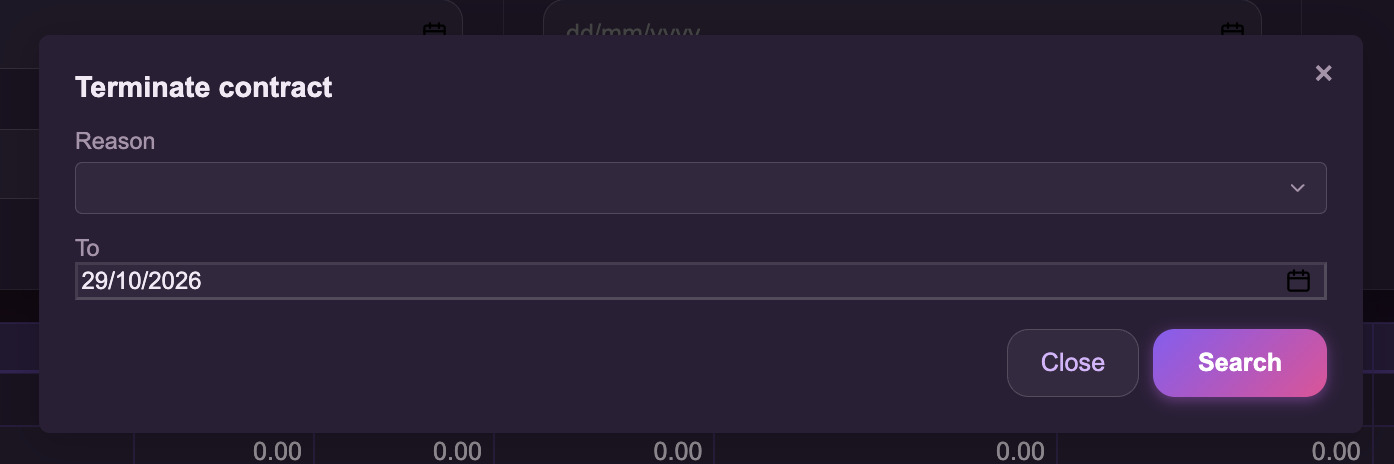
- 1
Reason: Select the appropriate termination reason.
- 2
To: Enter the employee’s last employment date.
- Click Search to review the termination requirements and payment information.
- 1
Review requirements: Check the legal requirements and information displayed for the selected termination reason.
- 2
Search: Click Search to continue with the termination calculation.
The status shown, such as Allowed, refers to the selected reason. It does not confirm that all legal or contractual requirements have been met.
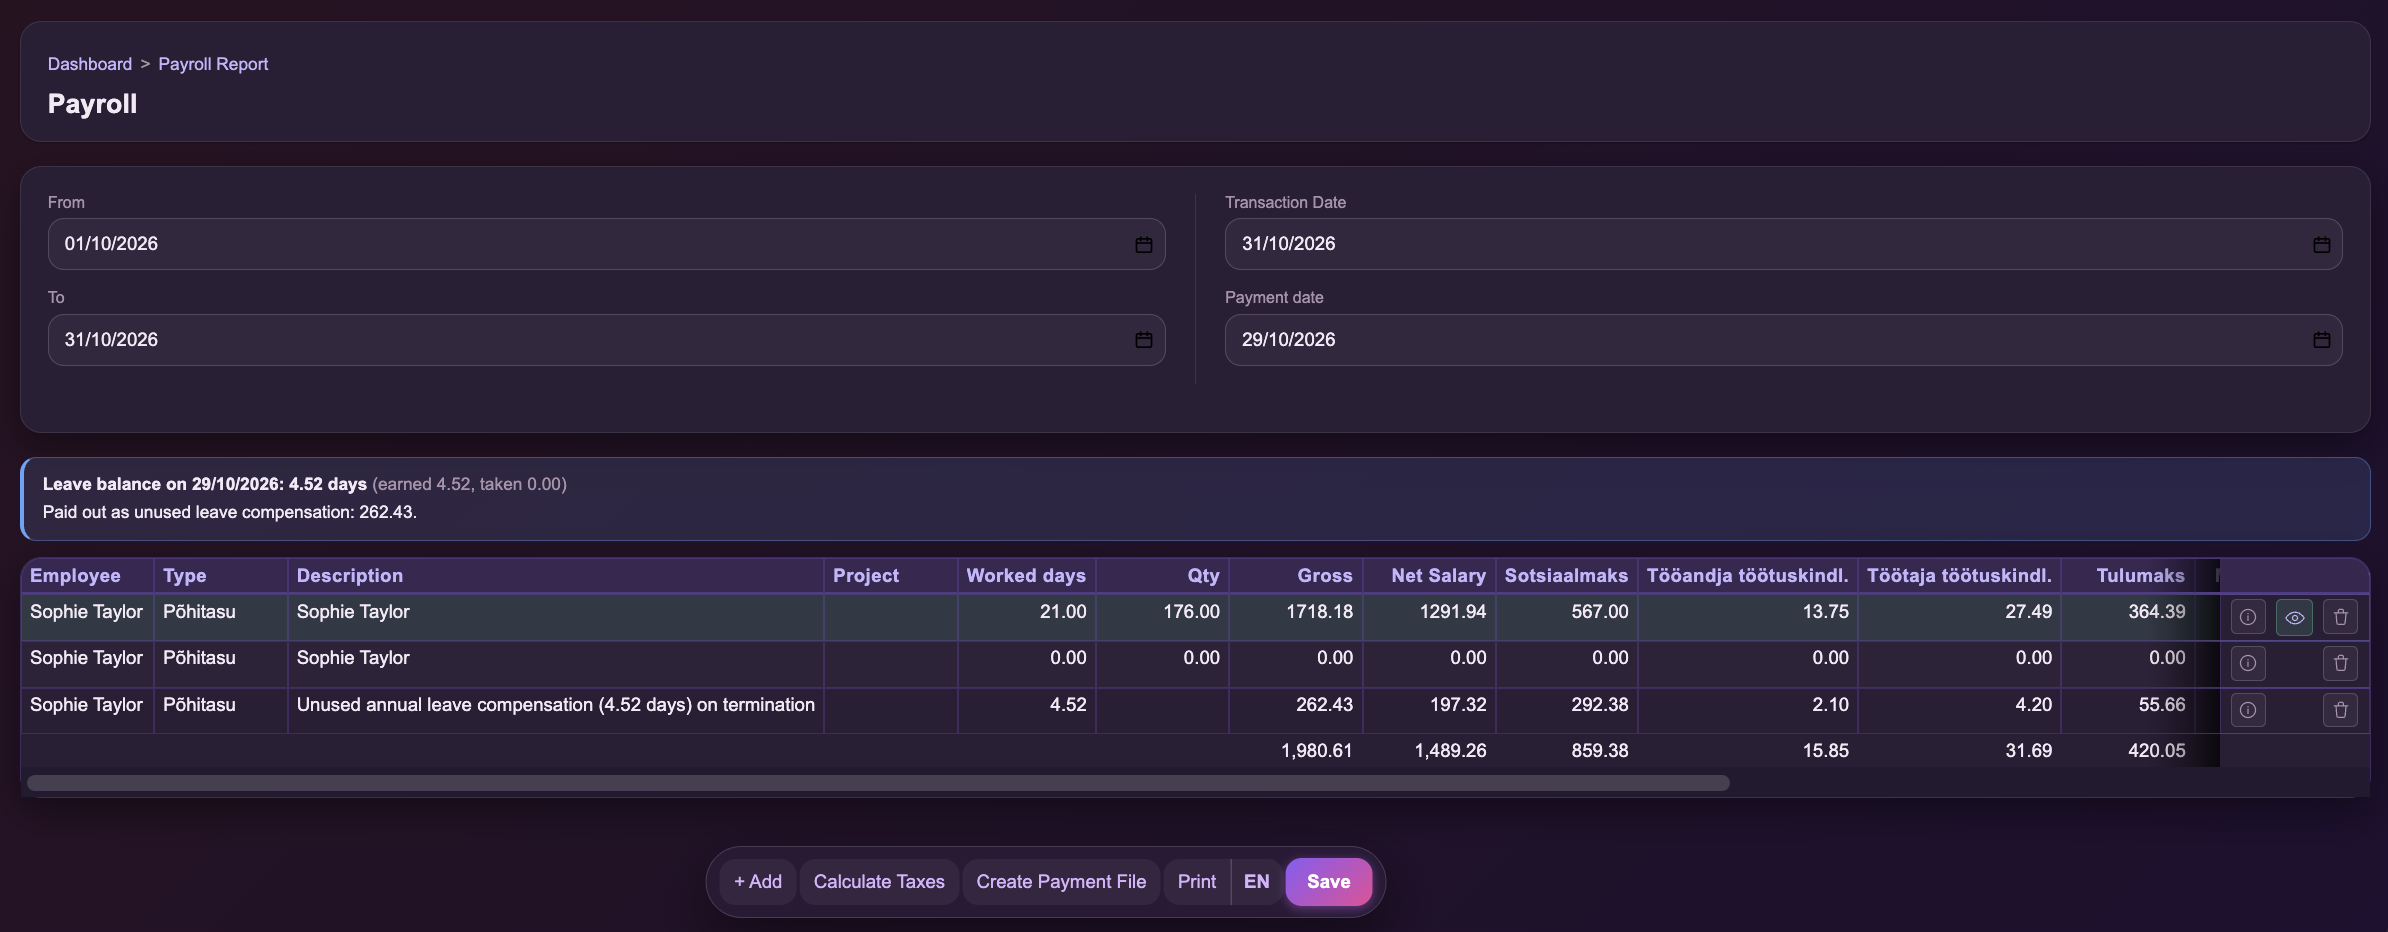
- Review the payroll calculation, including any outstanding salary and unused annual leave compensation.
- Click Save to save the payroll calculation.
- 1
Review final payroll: Check the salary and unused annual leave compensation.
- 2
Save: Click Save after confirming the calculated amounts.
This example shows Sophie Taylor, with an end date of 29/10/2026 and 4.52 days of unused leave. The amounts depend on each employee’s own data.
Important: Employment Register (TÖR). Terminating an employment contract in Payroll24 does not automatically update the Estonian Employment Register (TÖR). You must register the employment termination separately in TÖR. See Employment Register / TÖR for more information.
Leavers
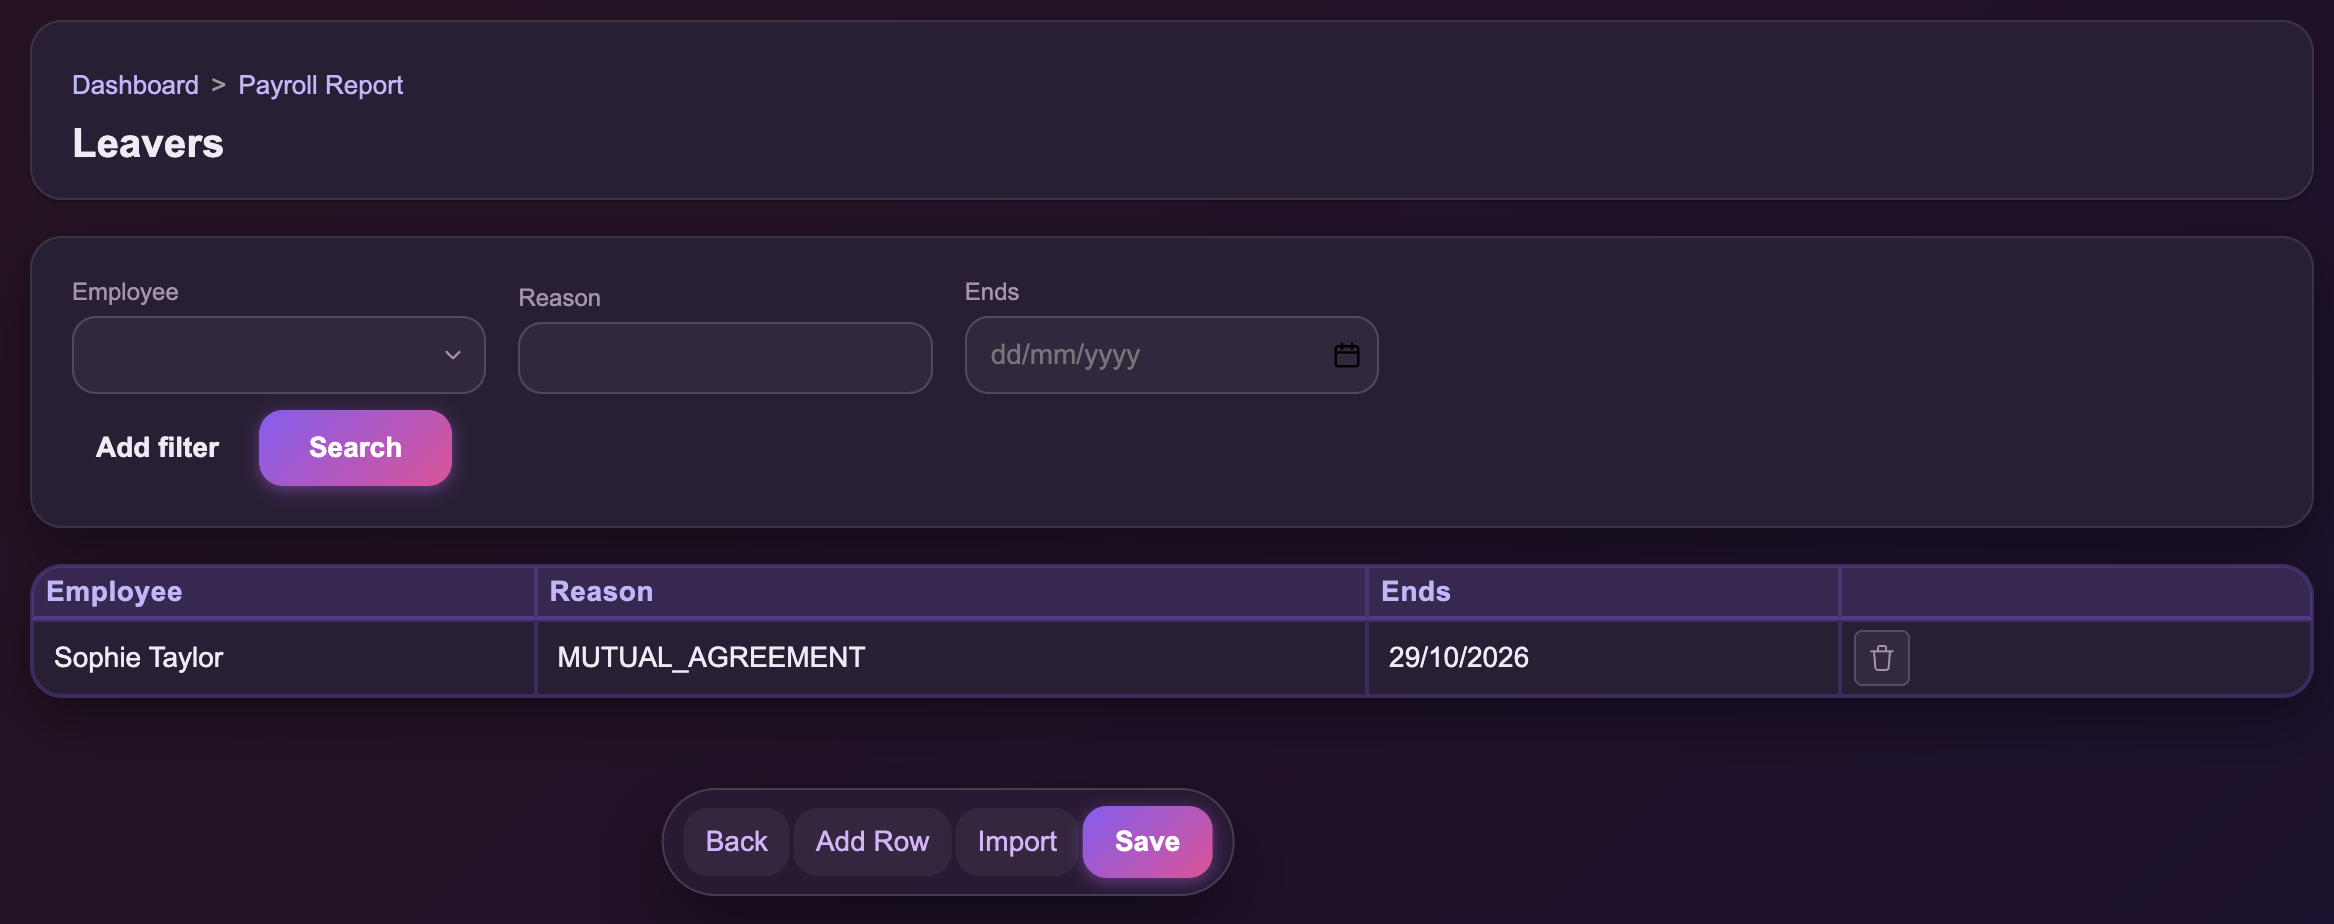
After saving the payroll calculation, open Leavers to check the employee’s termination record.
Each record shows the employee, termination reason and employment end date.
- 1
Verify termination record: Check the employee, termination reason and end date in the Leavers list.
Termination entered by mistake
If a termination was entered by mistake, contact Payroll24 support before changing the Leavers record.
Check the employee’s TÖR registration separately.
Employee-specific settings
Some payroll settings are specific to individual employees. Review them when an employee’s salary, tax circumstances or employment details change.
Employee attributes
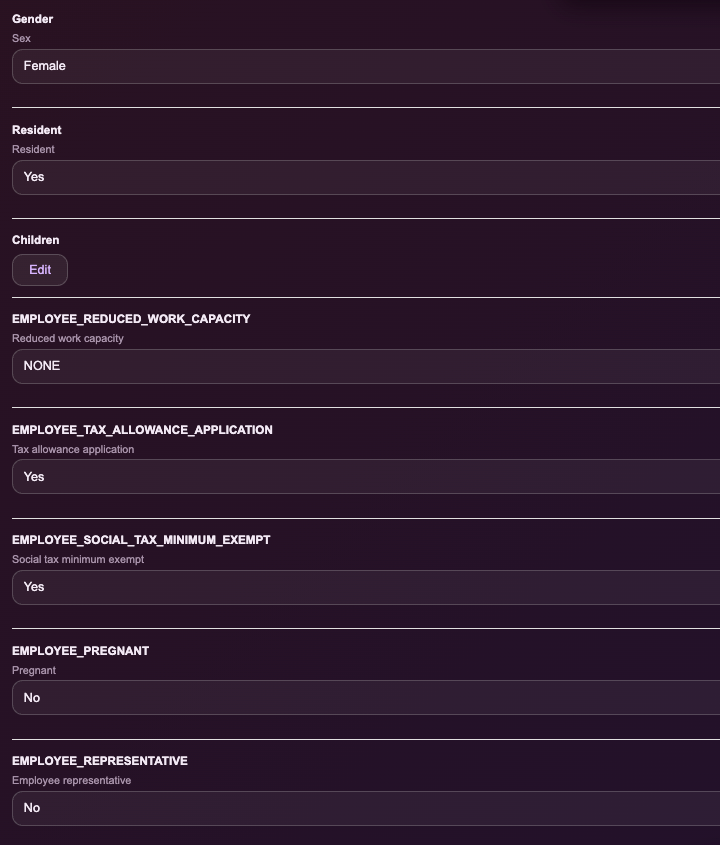
Employee attributes contain information that may affect an employee’s payroll calculations.
To review these settings, open Employees, find the relevant employee and select View.
Check that the attributes reflect the employee’s current circumstances.
| Employee attribute | Description |
|---|---|
| Gender | Records the employee’s gender |
| Resident | Whether the employee is treated as a resident for payroll purposes |
| Children | Records the employee’s children where relevant |
| Reduced work capacity | Records reduced work capacity where applicable |
| Tax allowance application | Whether the employee has submitted a tax allowance application |
| Social tax minimum exempt | Whether the social tax minimum does not apply to the employee |
| Pregnant | Records pregnancy where relevant |
| Employee representative | Records employee representative status |
Employee-specific tax settings must reflect the employee’s actual circumstances and applicable eligibility requirements. Selecting an attribute does not itself establish eligibility for a tax exemption or benefit.
Payroll Rules
Payroll Rules define an employee’s salary or pay rate, pay type, workload and the dates when each rule applies.
To review or update Payroll Rules:
- Open the employee’s Payroll Rules.
- Check the pay type, such as Base salary.
- Review the salary or pay rate and workload.
- Verify the applicable start and end dates.
- Save any changes.
The Payroll Rules screen is shown in Hiring and terminating an employee. For instructions on setting up a new employee, see Hiring and terminating an employee.
Reports and payroll outputs
After saving payroll, you can review salary calculations, export payroll data, prepare payment files and view employee payslips.
Payroll Report
Use Payroll Report to review saved payroll results for a selected period.
- Open Payroll Report.
- Select the relevant payroll period.
- Review Gross pay, payroll taxes and Net Salary.
- Select an employee using the checkbox, then choose the relevant action from the bottom toolbar.
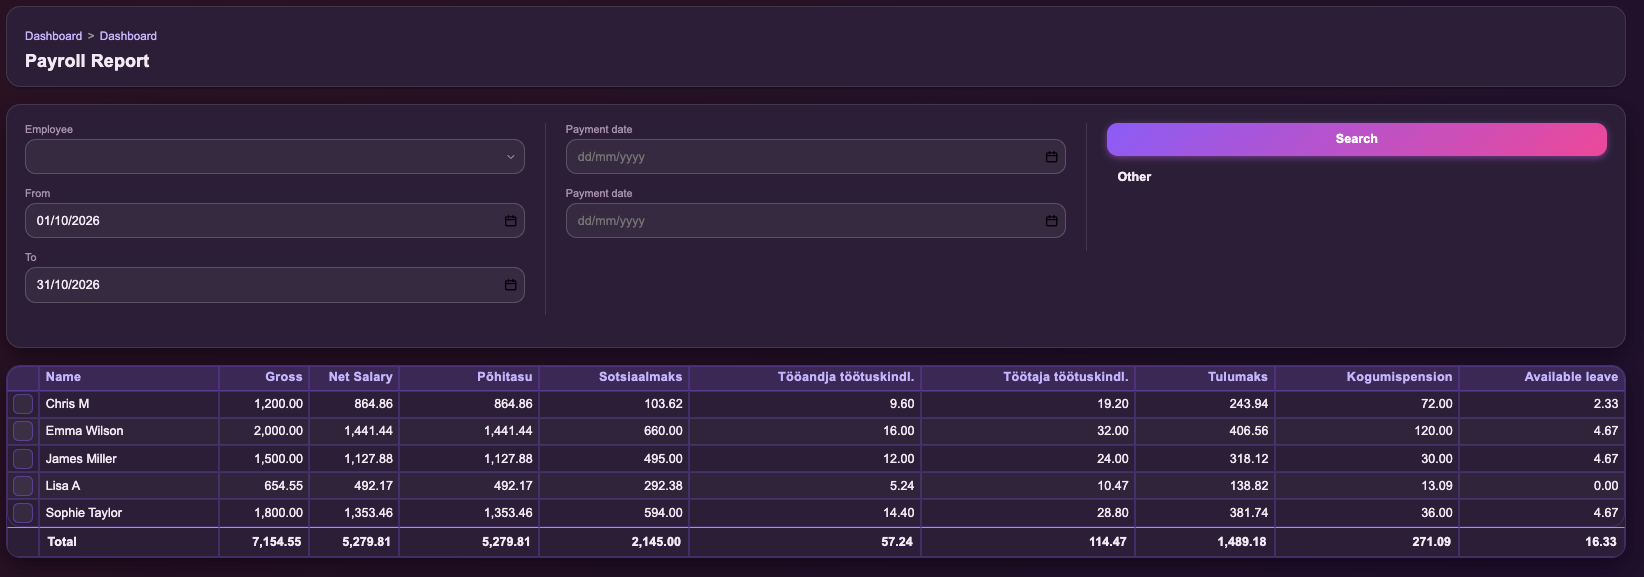
- 1
Payroll results: Review employee salaries, taxes and totals for the selected period.
- 2
Available leave: Check the employee’s available leave balance.
For calculating or correcting payroll, see Calculating salary.
Export
Open Payroll Report, click Export in the bottom toolbar, and select the required action. If downloading payroll information, save and review the file. For TSD submission and confirmation, follow the instructions in TSD: Payroll tax declarations.
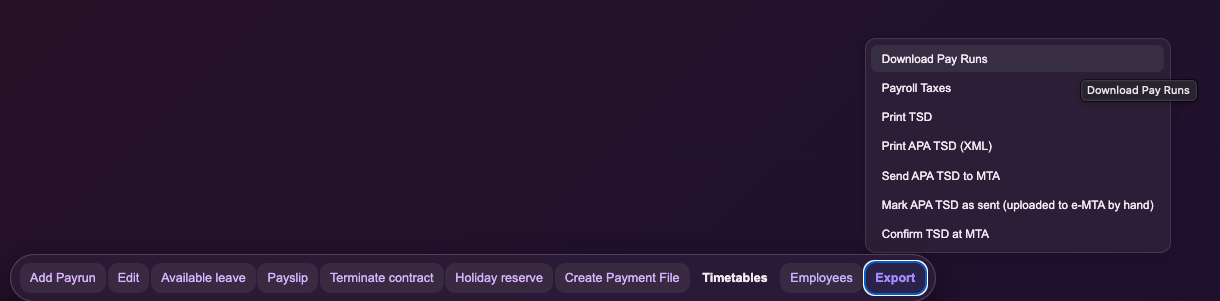
- 1
Export: Open the available payroll export options.
- 2
Download Pay Runs / Payroll Taxes: Export payroll results or payroll-tax information.
Create Payment File
To prepare a bank payment file after calculating payroll, see Create Payment File in Calculating salary.
Payslip
A Payslip shows an individual employee’s salary calculation, including Gross pay, payroll taxes, deductions and Net Salary.
To view a payslip, open Payroll Report, select the employee and choose Payslip.
TSD: Payroll tax declarations
Payroll24 provides tools for preparing and reviewing Estonian payroll tax declarations.
TSD (Income and Social Tax Declaration)
A monthly declaration reporting salary payments and related taxes to the Estonian Tax and Customs Board (MTA).
TSD viewer
Use the TSD viewer to review payroll tax information for the selected reporting period.
- Open Payroll → TSD.
- Select the reporting period and click Search.
- Review the Main form, Lisa 1 and Lisa 2.
- Check that the declaration information matches the relevant payroll records.
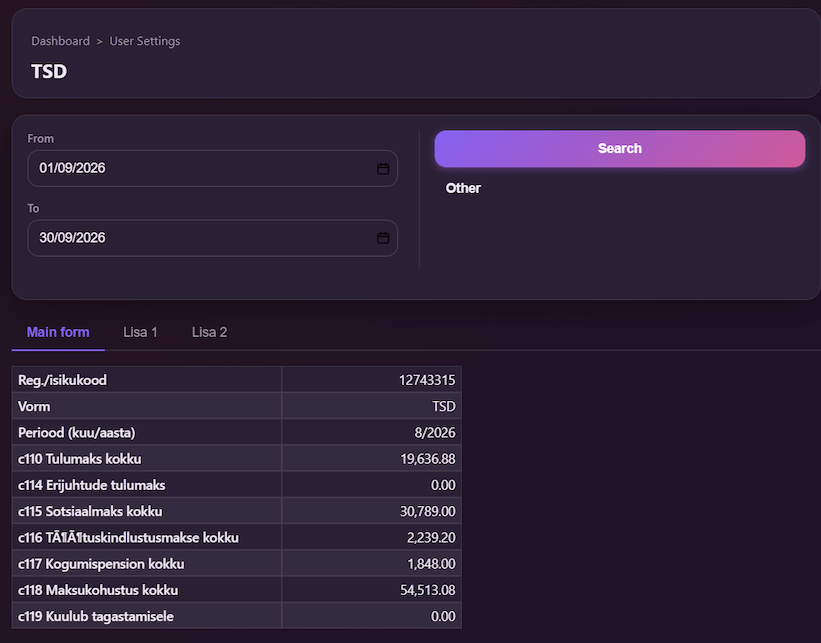
- 1
Period: Select the TSD reporting period.
- 2
TSD forms: Switch between the main declaration and its annexes.
Important: TSD is generally reported according to the month in which salary is paid, not the month in which it was earned.
- Salary period
- October 2026
- Payment date
- 1 November 2026
- TSD reporting period
- November 2026
- Ordinary filing deadline
- 10 December 2026
Reviewing the TSD viewer does not submit the declaration.
If the figures are incorrect, review the source payroll information and calculate payroll again where necessary. See Calculating salary.
TSD Export actions
Open Export to access the available TSD file preparation, submission and confirmation actions.
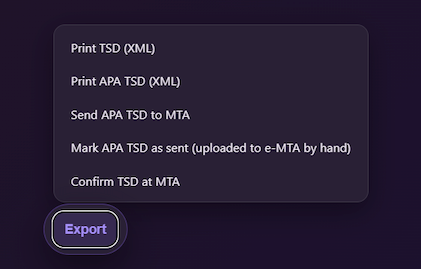
- 1
Export: Open the available reporting actions.
- 2
TSD actions: Select the appropriate action for preparing or handling the declaration.
| Action | Purpose |
|---|---|
| Print TSD (XML) | Generate the TSD XML file for manual use or upload. |
| Print APA TSD (XML) | Generate the APA TSD XML file. |
| Send APA TSD to MTA | Initiate electronic submission to the Estonian Tax and Customs Board. |
| Mark APA TSD as sent | Record that the declaration was uploaded manually through e-MTA. This action does not perform the upload. |
| Confirm TSD at MTA | Initiate the available TSD confirmation action at MTA. Check the result to determine whether confirmation succeeded. |
For general payroll exports, see Reports and payroll outputs.
After submitting or confirming
Check the available submission response or status to verify whether the declaration was successfully submitted or confirmed.
Generating an XML file or recording a manual upload does not itself submit the declaration.
Warnings
A warning means Payroll24 found something that should be reviewed. Some warnings may allow you to continue, but you should understand the reason before proceeding.
Errors are different: they usually mean information is missing or inconsistent and must be corrected before the action can continue. See Errors and troubleshooting.
| Warning | What to check |
|---|---|
| Vacation days exceeded | Check the employee’s accrued leave balance and recorded vacation dates. |
| Study leave days exceeded | Check the recorded leave dates and whether the applicable limit has been reached. |
| Termination check | Review the termination information and the condition shown in the warning. |
| Termination filing reminder | Check the relevant employment registration information and filing deadline shown. |
| Average pay has no history | Check the employee’s Payroll Rules and whether an Opening Balance is needed. |
Before continuing
Review the information mentioned in the warning. If something is incorrect, update the relevant employee, payroll or absence information and calculate again where necessary. See Absences and timesheets, Employee-specific settings or Hiring and terminating an employee.
If the warning is unclear or the result remains unexpected, see Errors and troubleshooting or contact Payroll24 support.
Errors and troubleshooting
Errors usually indicate missing or incorrect information that needs to be corrected before continuing. For messages that require review but do not necessarily prevent an action, see Warnings.
Common errors
| Error | What to check |
|---|---|
| Missing payroll type | Check Payroll Types and the employee’s Payroll Rules. |
| Missing absence rule | Check Absence Rules for the relevant absence or pay type. |
| Missing days worked | Check the selected payroll period and working time in Timesheets. |
| Missing payment date | Enter the payment date for the payrun. |
| Organisation country missing | Check the organisation’s country information. |
| Not enough payroll history | Review the employee’s Payroll Rules and whether an Opening Balance is needed. |
| Overlapping Opening Balances | Check for overlapping balances covering the same period. |
| Time entry already running | Finish the active Timesheets entry before starting another. |
| Termination end date missing | Enter the employee’s employment end date. |
| Termination rule not available | Review the selected termination reason or contact support. |
If payroll results look incorrect
If payroll calculates successfully but the results are unexpected, check the information used in the calculation.
Review in this order:
- Employee details: Verify employment information.
- Employee attributes: Check individual tax and payroll settings.
- Payroll Rules: Review salary, pay type, workload and applicable dates.
- Timesheets: Check recorded working hours.
- Absences: Review vacation, sick leave and other absence records.
- Payroll period: Verify the calculation period and payment date.
For detailed instructions, see Employee-specific settings, Absences and timesheets, or Hiring and terminating an employee.
Correcting the problem
Update the incorrect or missing information, then calculate payroll again.
If the payroll has already been saved, see Editing a saved payroll.
Known limitations
Warnings when editing a payrun
Some warnings may not appear again when recalculating an already-open payrun.
If the payroll result looks unexpected and no warning appears, review the salary calculation details. If you still need assistance, contact Payroll24 support.
Custom payroll rules
Custom payroll rules support selected payroll and benefit calculations, but not every type of calculation can be customised.
If you need a specific customized rule, contact Payroll24 support to check the available options.
Need help?
If you need assistance with Payroll24, contact our support team.
Contact Payroll24 support
When contacting support, briefly describe the issue and include any relevant error messages, payroll period or screenshots.
Avoid including unnecessary employee identification numbers or other sensitive personal information in support requests.
For common issues, see Warnings or Errors and troubleshooting.